

The Direct Mail Management System (DMMS) is written with a combination of Visual Basic 6.0. and web pages using the PHP web scripting language. DMMS uses the PostgreSQL (Postgres) database, which is an ANSI 92 compliant SQL relational open source database system. A relational database is a made up of a number of Data Tables that are connected to each other by sorted keys such as Vendor Number. There is a Table for Jobs, Customers, Vendors, etc. The Customer in a Package is "related" to the Customer file by a unique Customer number. When Customer information such as a street address or Zip Code is changed in the Customer file that change is automatically reflected in every record in the Job Table. There are intentional exceptions to this rule to give the system more flexibility such as contact names and phone numbers since there may be more than one contact at a company.
The system has been designed so that it can be operated solely with the keyboard or with a combination of the keyboard and the mouse. This is very important for productivity in a data entry environment. All pull-down menus and command buttons have keyboard shortcuts utilizing the Alt key with a letter or number that allow the user to activate them. For example: The Add menu selection on any screen can be accessed by clicking it with the mouse or holding down the Alt key while pressing the "a" key. This enhances data entry efficiency and users are encouraged to try both the mouse and the keyboard methods to decide which works best for them. The one exception is the Duplicate command button on Screen 1 of Jobs which is a very powerful feature and therefore has been intentionally left without a keyboard shortcut. (See Jobs - Screen 1)
There are multiple ways of getting around in the system:
The System starts with the Main Menu.
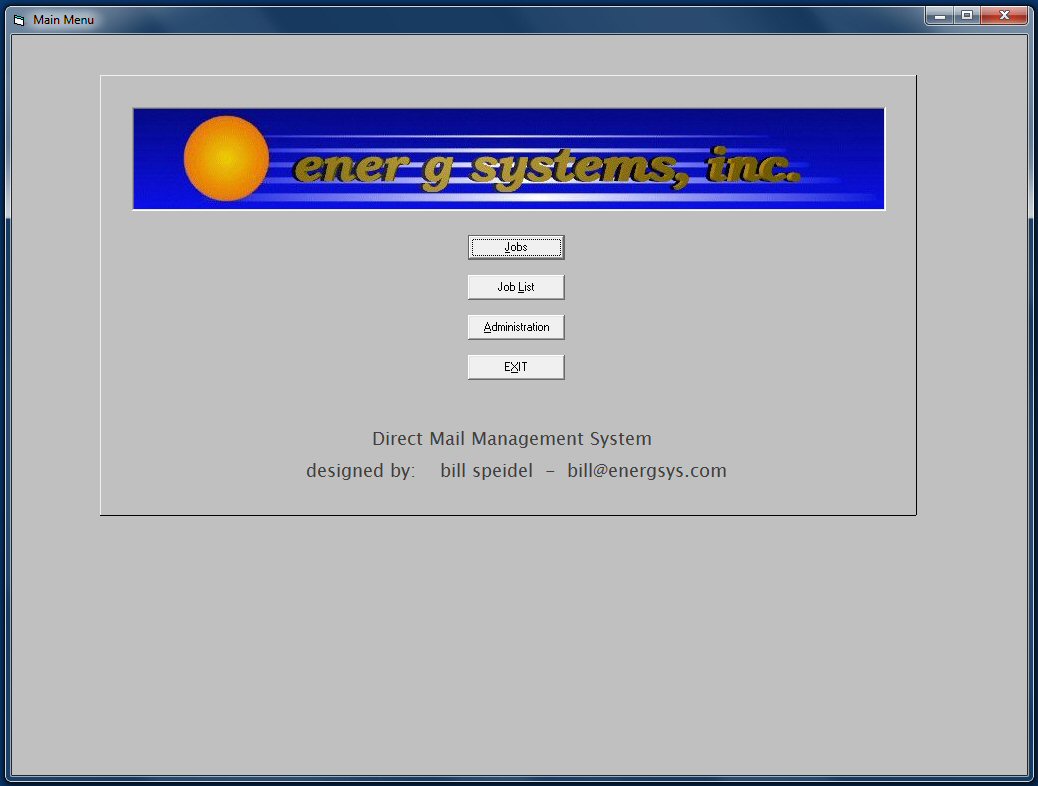
From the Main Menu users can access all of the System's Dynamic Data. A distinction is made between Dynamic Data or data that changes frequently or is constantly being added to (i.e. Jobs, Vendors) and Static Data, which changes infrequently (i.e. Shipping Methods such as FedX and UPS). Users can also access the Admininstration and Reports Menus which will be discussed later.
When a user selects a Table (i.e. the file in which data is stored) such as Jobs an initial SQL Query is run selecting the last 200 records in the table. Generally these will be the records of most interest. From that start the user has several choices of movement:
Using Menus - The Main Menu takes the user to subsidiary menus for Jobs, Clients, Vendors, Prospects, etc. and to the Accounting and Reports Menus. NOTE! The system always starts with an initial query when a table such as Clients is chosen from the Main Menu. Then the user selects one of the following methods to move through the records in that table. When the Accounting or Reports Menu is chosen the user is presented with another menu.
Navigation To A Specific Record - By using [Alt - F] (holding down the Alt Key and hitting F) or by clicking on the Find Menu Item at the top of a Data Entry Screen a drop down menu will appear allowing the user to find a specific record. Selecting one of the choices by using the keyboard or the mouse will bring up an input box that prompts the user to enter all or part of a number or text string. After the number or text is entered the user may press the [RETURN] key or click OK on the input box. The system will then search for an exact match or the next greater match. For example if the user is looking for ABCDEF Company and the user types in "ABC" the system will find the first record that matches "ABC". If there is an ABC Company the search will stop there. If there is only an ABZ Company and nothing starting with ABC the search will stop at ABZ because it is the next greater match. Once a search has found a match the user can then utilize the following method to move through the Table one record at a time.
Navigation One Record At A Time - To move through a Table one record at a time the user presses the Page Up or Page Down Keys. NOTE! The Navigate Command Button at the bottom of each Data Entry Screen must be Highlighted (also called having focus). When a command button has focus (also called highlighted) it will have a series of small dashes around its perimeter. The user can use [Alt - N] or click on the Navigate button to give it focus. When the Navigate button has focus the user can press Page Up or Page Down to move through the records one at a time. NOTE! The System always starts with a default sort to order the records. This sort is typically the unique number of the record. (e.g. Job Number, Customer Number). Changing the sort - Each Data Entry Screen Allows the user to Change the sort at will. When new SQL queries are run the sort can be changed by selecting a field to sort by when choosing the parameters for the query. The system will pull the new records and the order of records will be determined by which sort field was selected. This facilitates the process of finding a record when the user only knows a range that the record might be in. If the user wants to move quickly to the beginning or the end of a Table they can use the following method.
Jumping To The Beginning Or End Of A Table - This is accomplished using the HOME and End keys. While the Navigate button has focus the user may press the End key and the system will automatically jump to the end of the SQL Selection using the current sort. The Home key will jump to the first record in the SQL SELECTION. NOTE! Keep in mind that HOME and END are relative to the sort used by the initial query or the user's SQL query.
Navigating Through Multiple Screens - The Jobs table needs more than one screen to display it's data. NOTE! Navigation can take place when the focus is on the Navigate Button and one of the Screen Number Buttons is clicked. Users may also use the Screens Drop Down Menu to Select a screen to move to. When each screen loads for the first time the Navigate button has focus. You can tell because it will be highlighted by having a dashed line running around the edge of the button. To move from one screen to another press a number on the keys above the letter keys (the number pad sends a different code) or use the Screens Drop Down Menu. To move from Screen 1 to Screen 3 simply press the '3' key on the keyboard. Screen 3 will display. To go back to Screen 1 press the '1' key or click Screen 1 in the Screens menu. The Jobs table uses eight screens. All of the other tables have one screen each.
Using SQL(Standard Query Language) - Finding a group of records that match certain criteria is best handled by the SQL Query Selection on the Menu Bar on all Screen 1's. By selecting fields and operators from the Combo list Boxes and entering values the user can perform an SQL search that selects only the records that match the given criteria. Then the user can use the other methods of navigating through the system to move through the records returned by the query. First, click on SQL Query, the Start Query. The user will be prompted with the following screen.
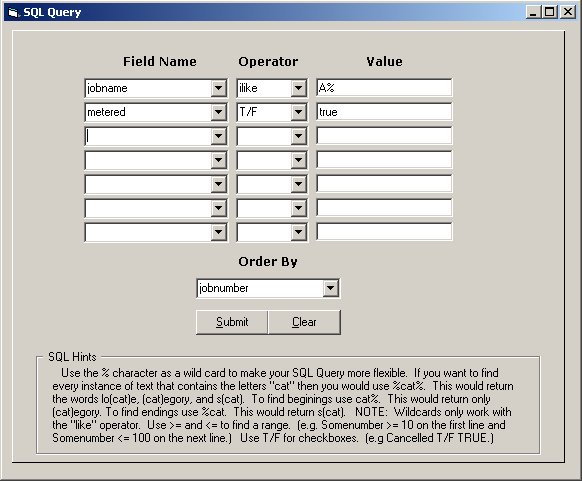
When the submit button is clicked the Query will run and only those records that match will be selected for viewing. If no records are selected a message will pop up saying so. NOTE! It is important to remember that selecting all records in the database may require heavy PC resources and should be avoided unless absolutely necessary. SQL Selections should be designed to select only records that are necessary. Selecting EndQuery/Refresh Data from the SQL menu will return the user to the initial query used when a table is opened for the first time.
Complex SQL queries such as those containing the OR operator and parentheses can be written and saved using the
following screen that is available from the top menu in most screens. This is a very powerful tool that users
are encouraged to learn for everyday use.
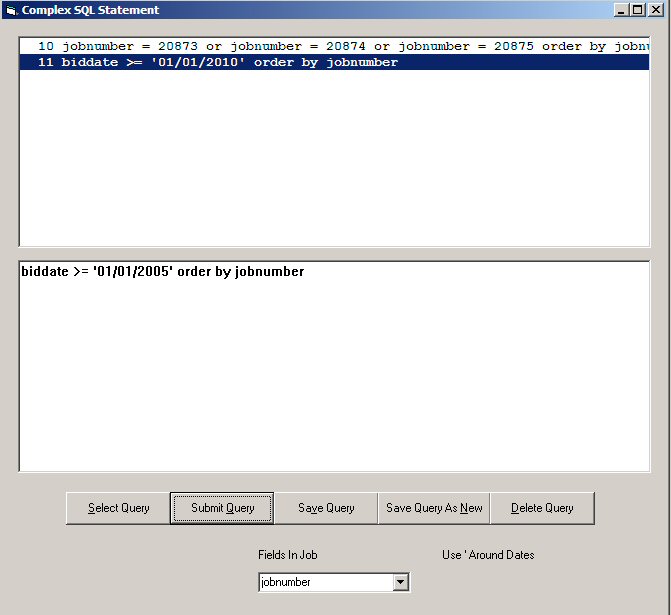
The SQL Operators are = (equals), >= (greater than or equal to), <= (less than or equal to), T/F (true or false), and like and ilike (pattern matching). T/F is used for checkboxes. A Job that has the PreSort checkbox checked is found by the SQL Statement proesort - T/F - true. Unchecked is false. The SQL Operator 'like' matches patterns and uses the '%' as a wild card but is case sensitive. 'Ilike' is the same as 'like' but is case insensitive and is preferred. Jobname - ilike - G% would find all the Job names that start with 'G' or "g' . Using ilike would find upper and lower case names. Jobname - ilike - %Gov% would find 'GOV', 'gOv', 'goV', etc. And Jobname - ilike - %ing would find all the lists that end in 'ing', 'ING', 'iNg', etc. The = operator finds only exact matches and is used primarily for very narrow searches.
NOTE! SQL queries display a snap-shot of the data in the database. Until Save or Undo or a new SQL Query is run changes made by other users or processes will not be displayed!
The Jobs selection from the Main Menu brings the user to the heart of the DMMS System. The Job Data Entry and Inquiry Screens. From these screens the user can enter new jobs to the system, update existing jobs; view, email, fax and print out various forms such as Bid Requests, Purchase Orders, Reports and The Mail Control Plan. Many, if not all of the other tables in the System will be accessed by the job screens for pulling in information as data is entered, displaying data from other tables in drop-down combo boxes to be selected for inclusion in a particular job or for displaying information about the current job from other tables such as List Items.
Jobs Support Files
All of the other Tables in the System exist to support Jobs and they need to be there before the first Job is written. However, because of their subsidiary role they will be discussed after Jobs. Simply keep in mind that before a Job can be effectively written the user will have to create Clients, Vendors and other necessary information.

When Jobs is first selected from the Main Menu the Initial SQL Query is run and Screen 1 of the first record in the Query is displayed. To enter or change data in any of the System's screens the user must either be in Add or Edit Mode. When Add is activated (by using [Alt-A] or by clicking with the mouse on the menu bar at the top of the data entry screen) the system opens a new blank record and puts the user into the Client Number field to start.
If you don't know the Client Name press the F6 Key while in the Number field and you will get an input box that allows a search of the Customer or Vendor file using as much of the name as is entered. Use the % as a wildcard for your search. Or, you may search for a Client name using the Drop Down Combo box. Entering the first letter of the name and hitting the down arrow will jump you to the first match for that letter.
When Edit is clicked the user is put into the currently displayed record, also starting in the Client Number Field. NOTE! To move from one field to another use the TAB key to move through the fields and [SHIFT-TAB] (Holding the Shift key down while pressing the Tab key) to move in the opposite direction. When the user is finished adding or updating a record the changes are saved by [ALT-S] or clicking the Save item on the menu at the top of the screen. This is true for all Visual Basic screens. Web Pages, such as the Bid Evaluation Tabl,e will have an Update button that must be clicked to save changes.
In the upper left hand corner of the screen is the Screen Name - General Information. In the upper right hand corner are the familiar Windows Minimize, Maximize and Close buttons. This will be true for all Screens in the System.
Job # - This field is locked and cannot be entered into by the user. When adding a job it automatically assigns the next job number when the job is saved.
Bid Date - If the user Tabs out of this field leaving it blank the Bid Date will default to today's date. This saves typing today's date.
Entering the Mail Date and the Bid Due Date. Other date fields can be filled out with today's date by putting a "/" in the field and then tabbing out.
THE DUPLICATE BUTTON - This is a very powerful feature of the DMMS System. Once the user has entered an job the user may have several more Jobs for the same client that differ only slightly (lists, pricing, etc.). The user can "duplicate" a job in part or in it's entirety by clicking the duplicate button. The only change will be the assignment of a new job number.
When all data is entered and the Save Item is clicked or [ALT-S] is pressed and the 'SaveYesNO' Dialog box has been answered affirmatively the Navigate button is given the focus and the user is ready to move on to Jobs Screen 2. To get to Screen 2 from Screen 1 the Navigate button must have focus (be highlighted) and a Screen Number key must be pressed or the Screens menu must be used. The user will then be taken to screen 2. This is true throughout the system where there is more than one screen for a record. Currently only Jobs has multiple screens per record.
The Undo Menu Item - When In Add or Edit Mode press [ALT-U] or click Undo to erase any unsaved changes and return to the original data. Use Undo when the user decides not to add or change a record after starting the Add or Edit process or to display any changes made to the record by other users. NOTE! SQL queries display a snap-shot of the data in the database. Until Save or Undo or a new SQL Query is run changes made by other users or processes will not be displayed!
NOTE! The 'Rebid' menu selection on Screen 1 is very powerful and should be used with caution. In the event that a job needs to be rebid because bid items or quantities have changed significantly the 'Rebid' will delete all vendors, bids received and any purchase orders issued.
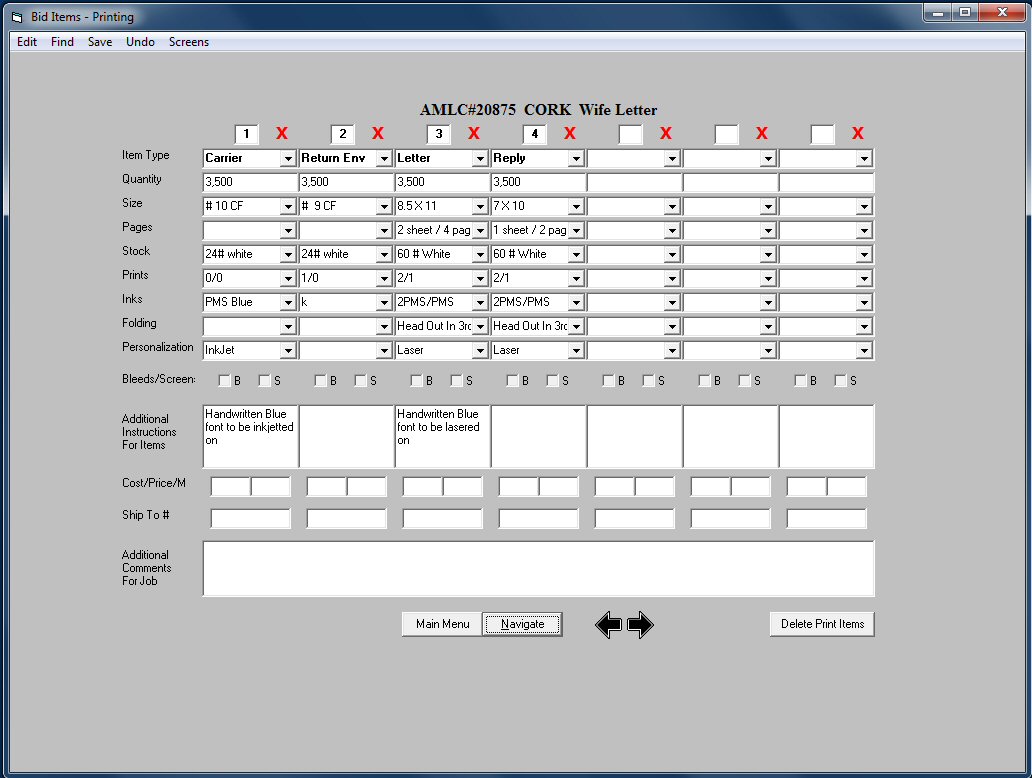
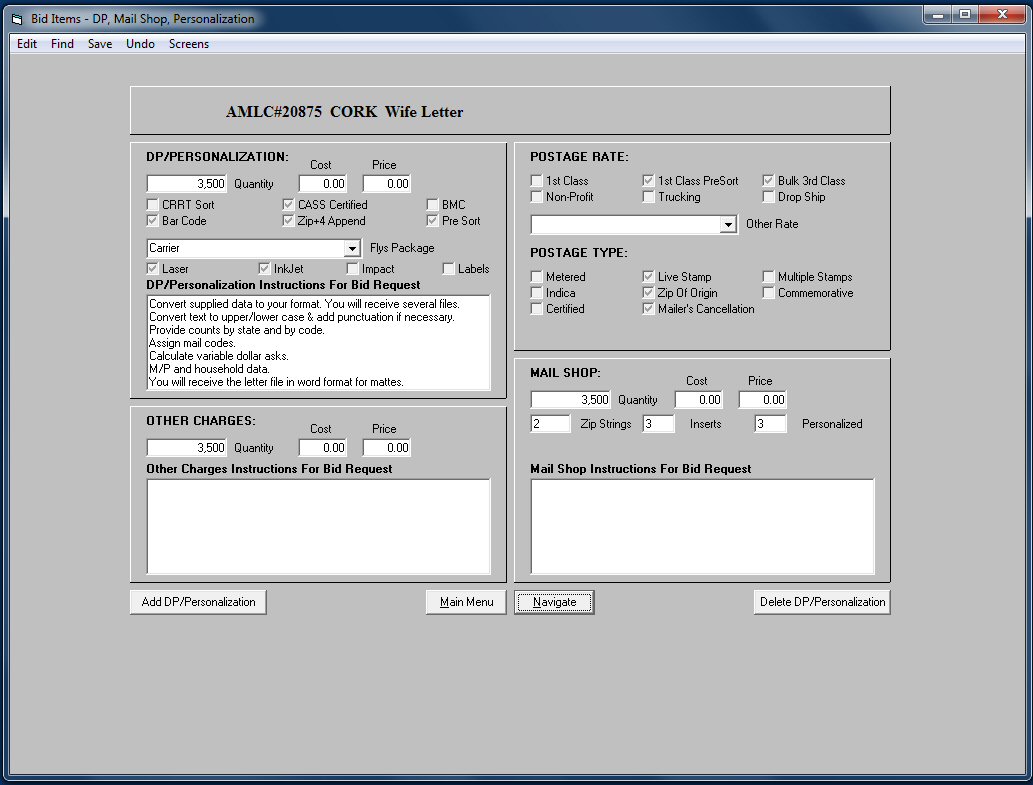
Screen 2 of Jobs is for entering up to 99 print items to be placed on the Bid Request and the Purchase Order. Item Numbers 100,100 and 102 are reserved for Mail Shop, DP and Postage. The System defaults to four print items when adding a record. You may add additional print items by simply entering the item type in the drop down combo box and then saving the new information. A new item number will be filled in. To delete an item simply click the red X when you are not in Add or Edit mode. If there are more than seven items you may add more by using the arrows at the bottom of the screen to display empty columns. If there are more than seven items a note at the bottom of the screen will display showing the number of items for the job.
All items may be marked up. The cost field is what the item will cost you. The price item is what you will be charging the client. Costs and prices may be filled out here, costs will be pulled in when filling out the Bid Evaluation. Costs and prices can be entered on the Mail Control Plan.
Screen three of Jobs is for Other Bid Items. The default text is pulled from the Support Table named Boiler Plate. This text may be changed and saved. When Edit mode is entered the check boxes and other fields may be filled in and saved.
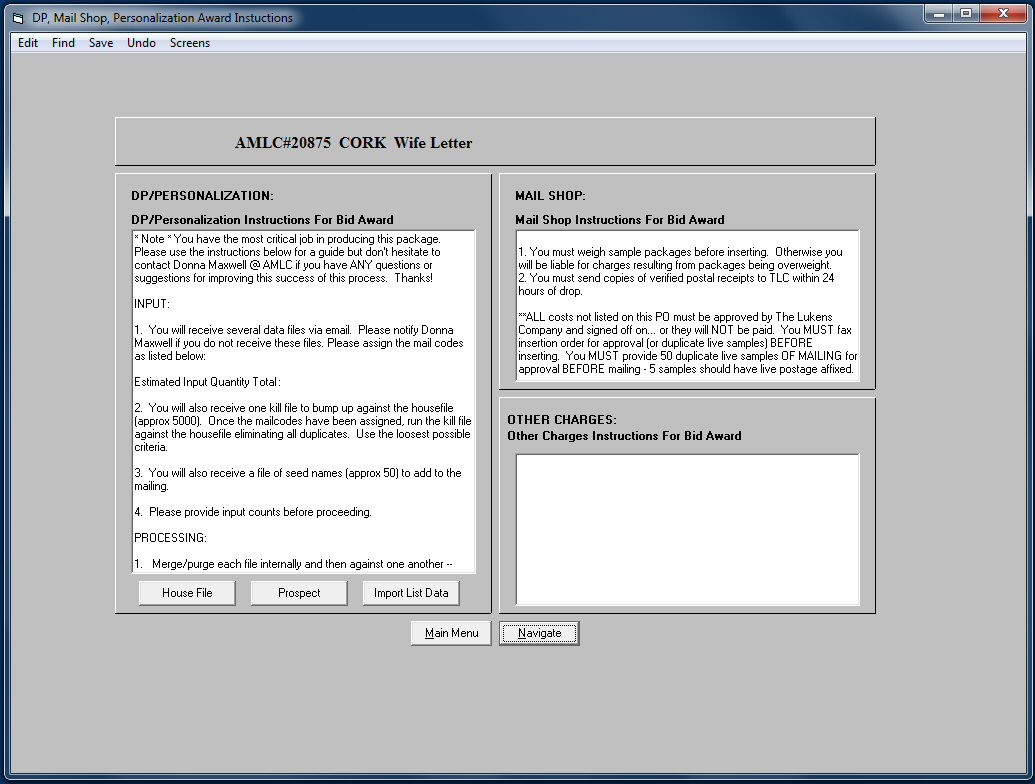
Screen four of Jobs is for Other Purchase Order Items. The default text is pulled from the Support Table named Boiler Plate. This text may be changed and saved. When in Edit mode clicking the 'House File' or 'Prospect' button will load the appropriate default text.

This screen shows all system maintained vendors in the left hand window. Double clicking or hitting [ENTER] when the vendor is highlighted will select them for the right window. Vendors may only be selected once. Double Clicking or hitting [ENTER] when the vendor is highlighted in the right hand window will remove the vendor. Selected vendors will be added to the vendorlist table for the job. Those vendors may then be sent emails or faxes requesting bids on the job items in screen 6. NOTE! There is a 'Rebid' menu selection on Screen 1. In the event that a job needs to be rebid because bid items or quantities have changed significantly the 'Rebid' will delete all vendors, bids received and any purchase orders issued.
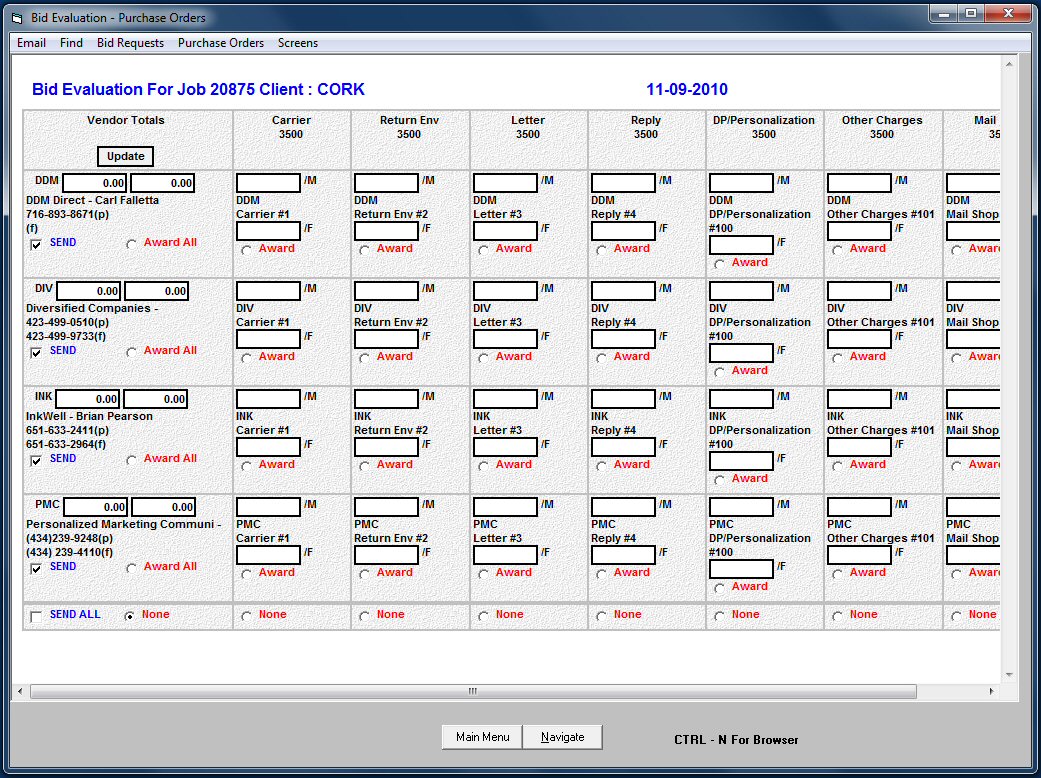
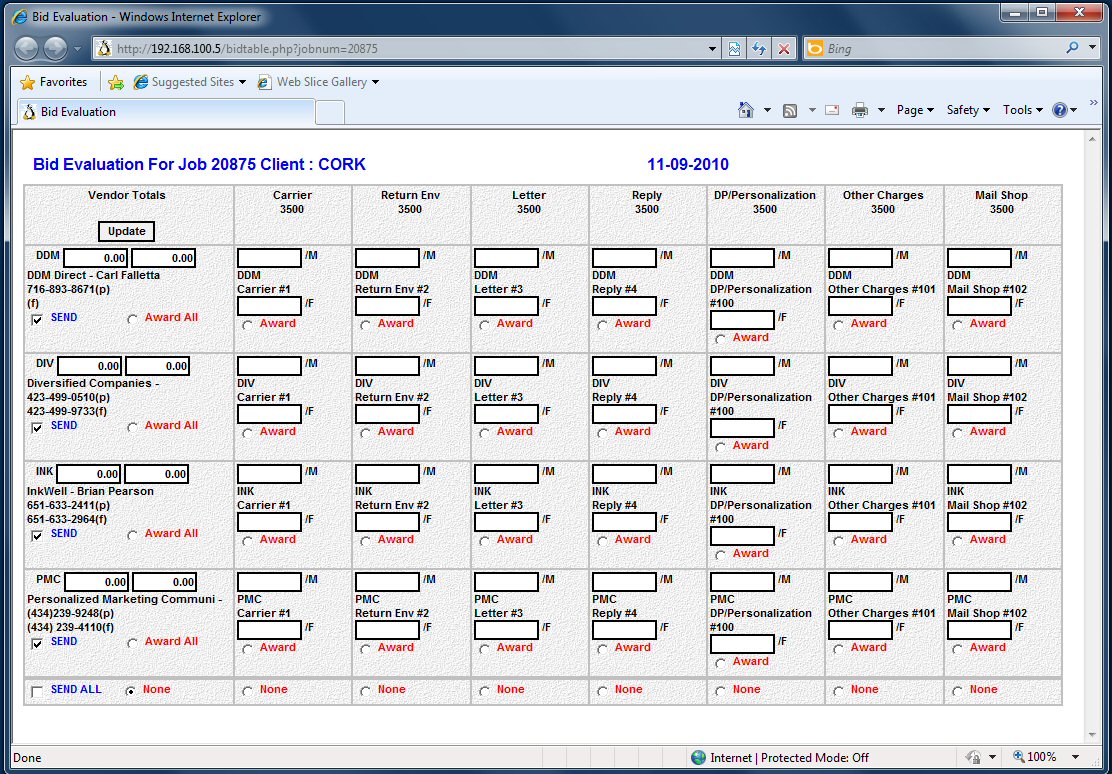
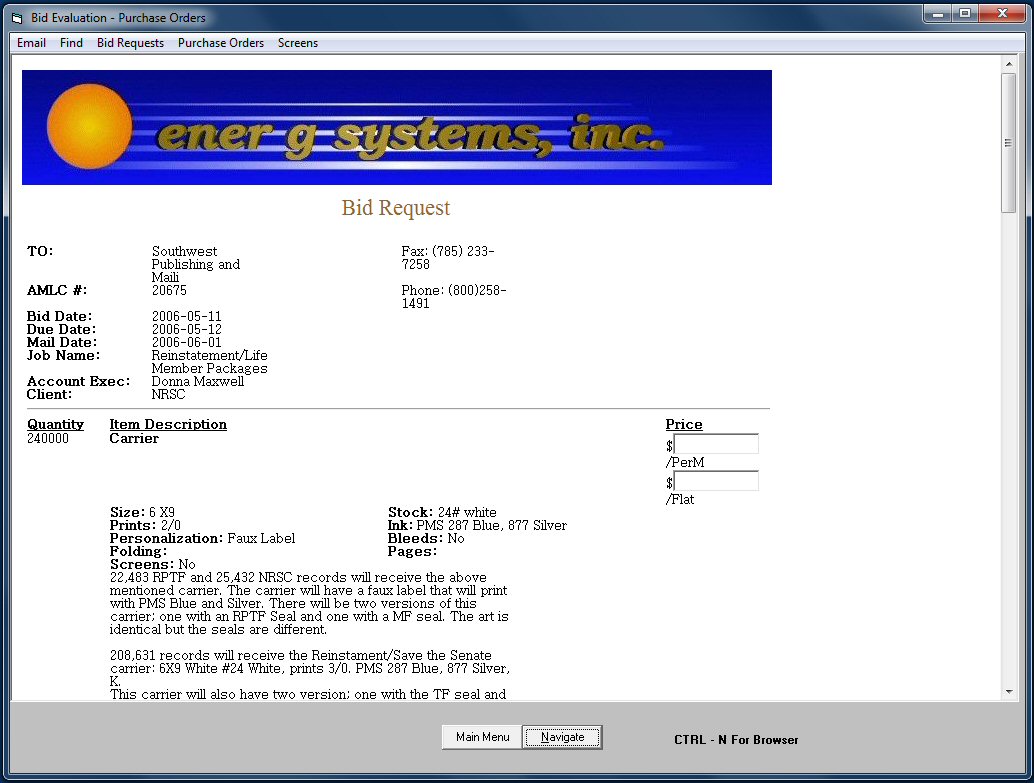
From this screen users may select vendors to send email bids to by clicking the Send check box in the appropriate vendors row and then clicking the Update button. NOTE! No changes will take place until the Update button is clicked. Clicking send all and then the Update button will select all vendors for an emailed Bid Request. To see a sample bid request prior to sending click Bid Rquest on the top menu and then Display Bid Request. To view the bid request in a browser, click on the display screen and type [CTRL - N]. The system will display the first Bid Request it finds. If you want to view a particular Bid request then select only that one to send/display. The bid request will display in the default browser. NOTE! This is primarily useful because the system is designed to be backward-compatible with lower resolution monitors (1024 x 768). Therefore to take advantage of higher resolution monitors you can display more of any web page based form using a browser to display them (see image below).
The Purchase Order Table is created when bid items have been awarded by clicking the appropriate radio buttons on the bid evaluation table and then Update. Once the bid items are awarded click Purchase Order and then Create/View/Approve Purchase Orders. New Purchase Orders will be created if none exist. Then clicking on the link in the table will display that Purchase Order. If the Purchase Order needs to be approved there will be a button at the bottom that can be clicked and a password entered to approve it.
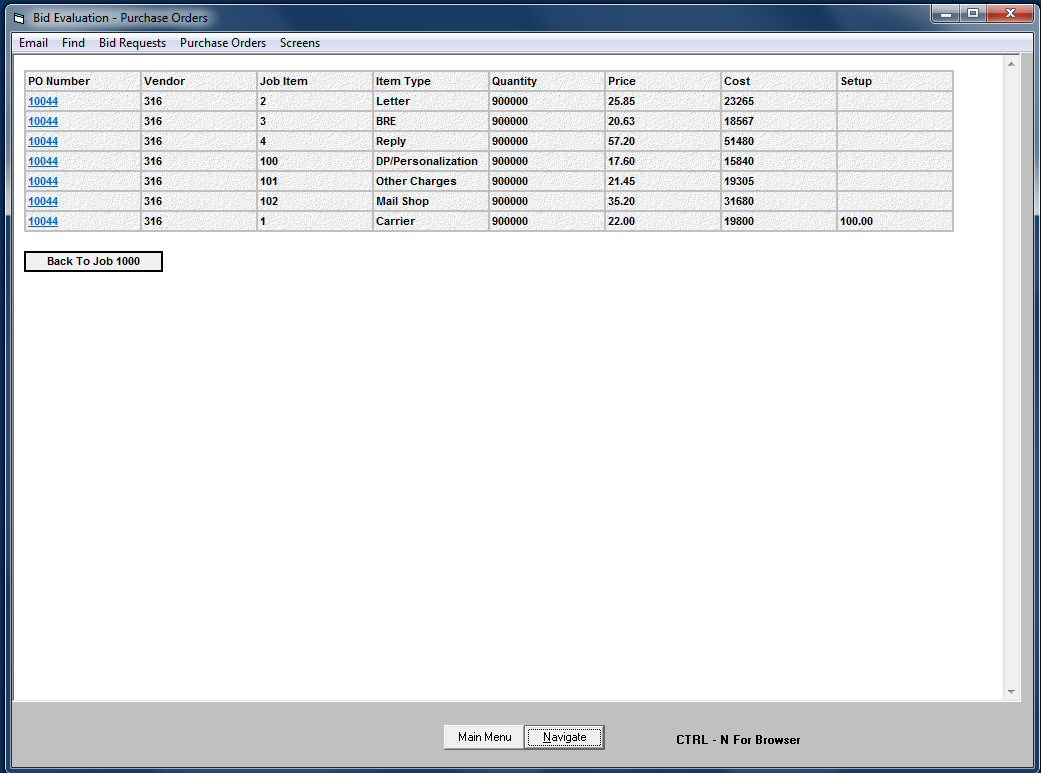
This is a typical Purchase Order Display.

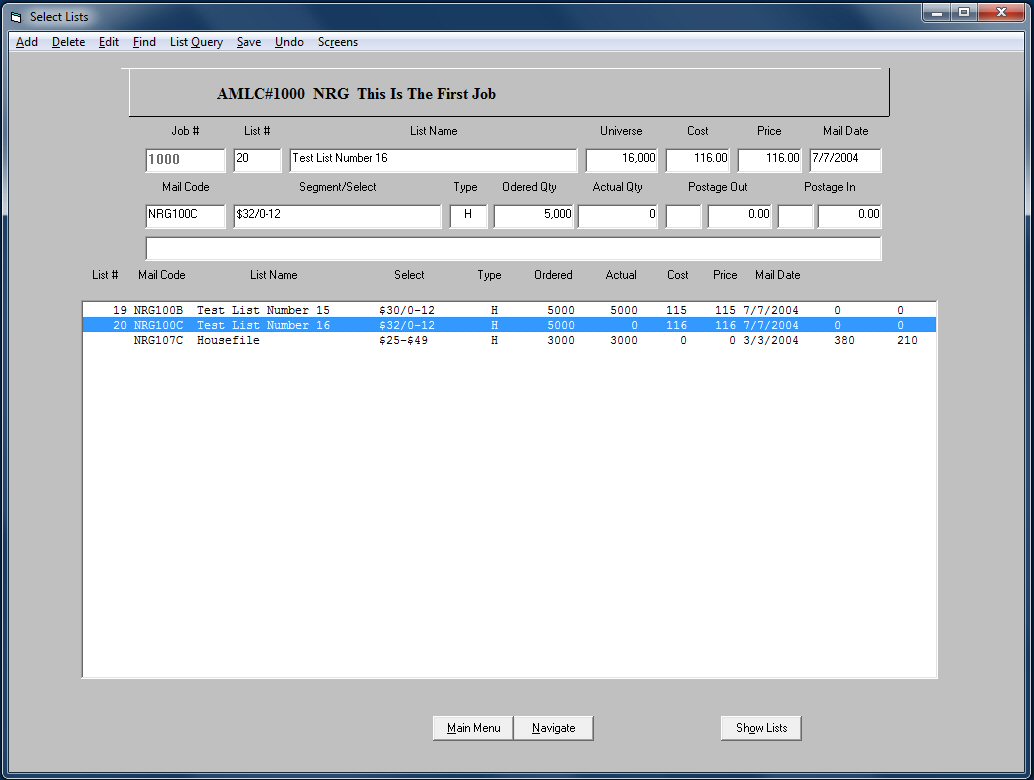
Screen 7 is used to add, edit or delete the lists that will be used for the job. If there are no lists currently created for the job there are three ways to add them. First, click Add and then enter the list data and save. Second, if there are lists already added to the Lists table you can run a List Query and select from the resulting display. Third, you can import lists from another system if the other system can create them in the proper format. To edit a list there must be at least one in the lower list box to select from. Double-click the one you want to edit and then click Edit on the top menu. Make any changes and then save. All of the list information will be used by the Mail Control Plan. To select postage rates and list types from the support files use the F6 lookup key when in the appropriate field.
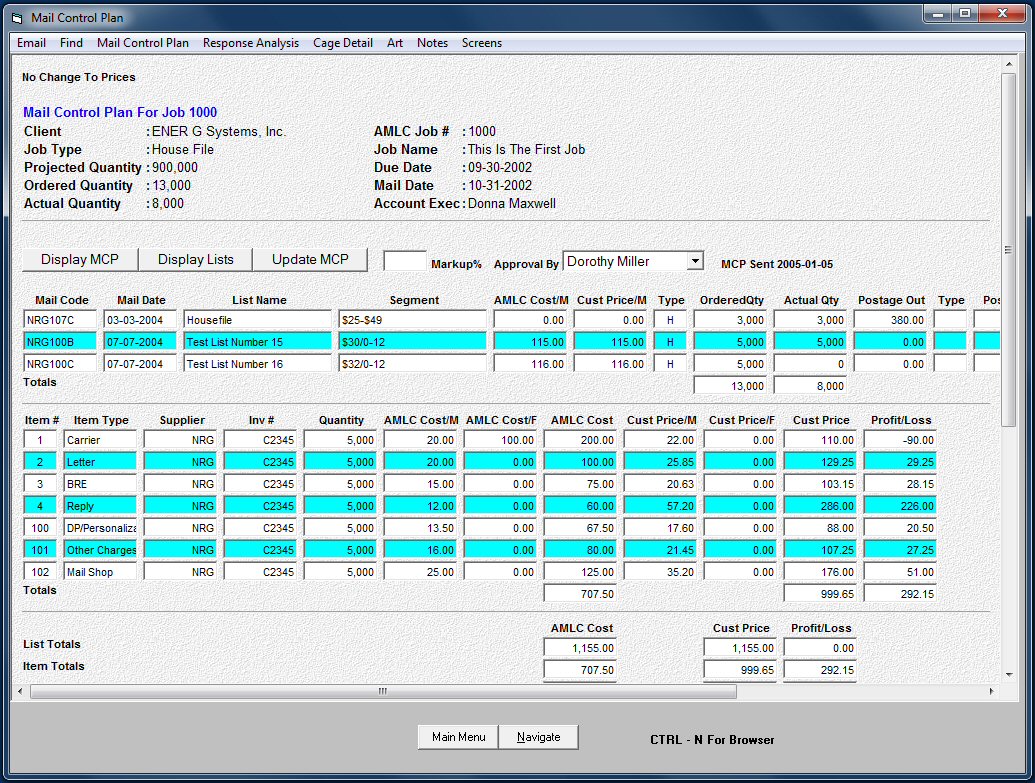
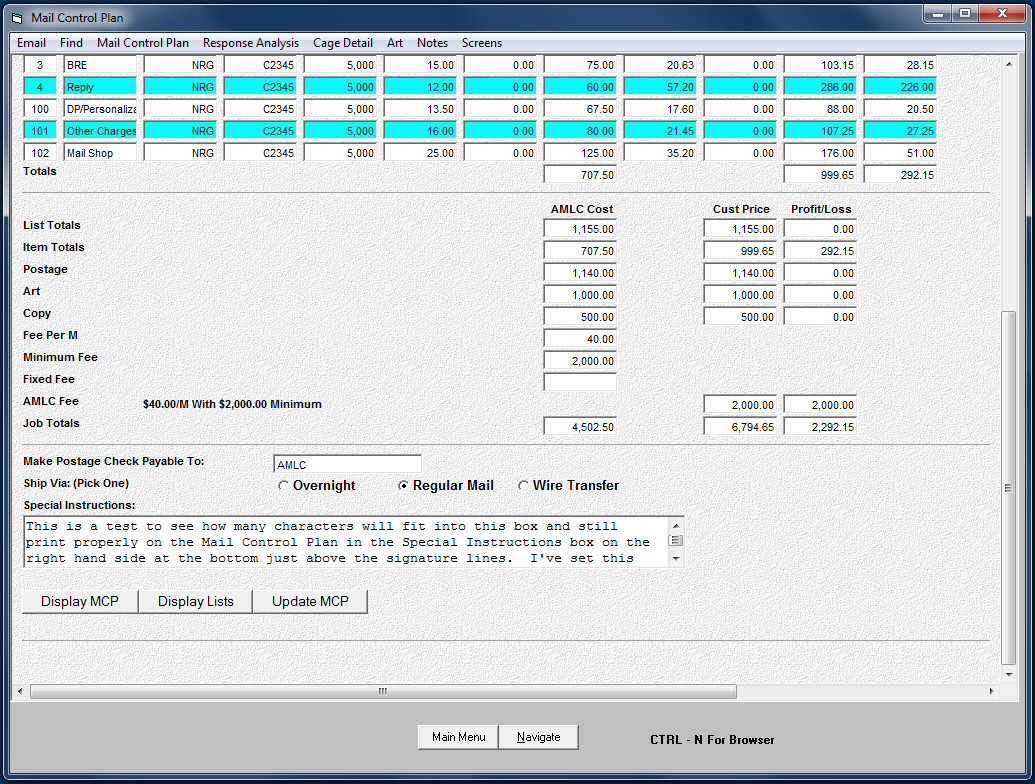
The Mail Control Plan is the heart of the system. From this screen you can view almost all of the necessary management information about the job and make changes to much of it. The screen is quite large and is best viewed using [CTRL-N] to view it in a web browser. Changes made here are reflected throughout the rest of the system. From the top menu The Mail Control Plan can be sent to the client by Email. The web browser can be used to print or fax it. There are two web pages related to The Mail Control Plan. One for bid items and one for lists. They must each be emailed, printed or faxed indidvidually.
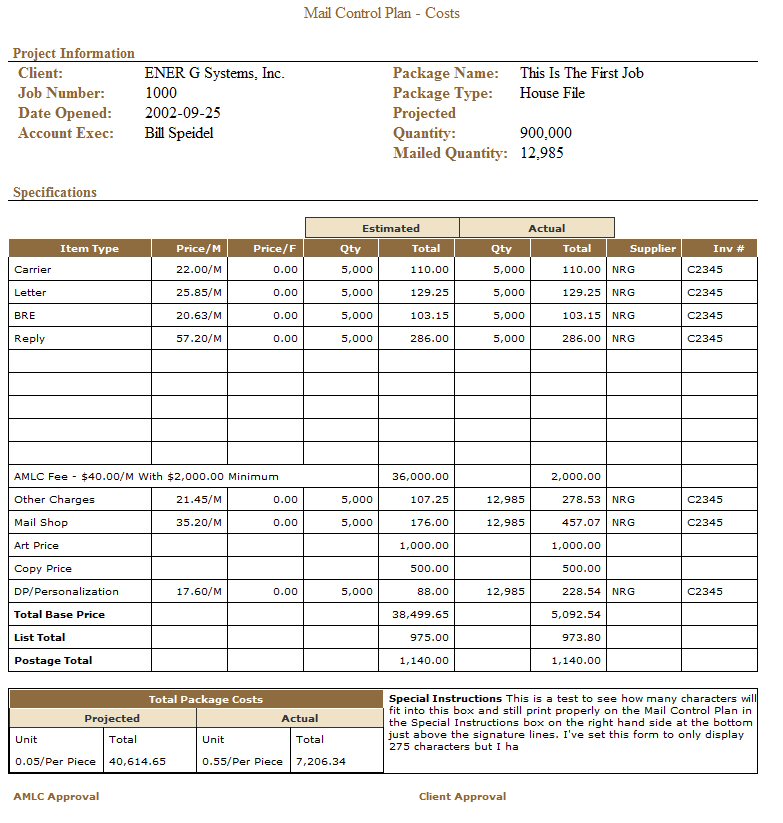
Mail Control Plan Costs
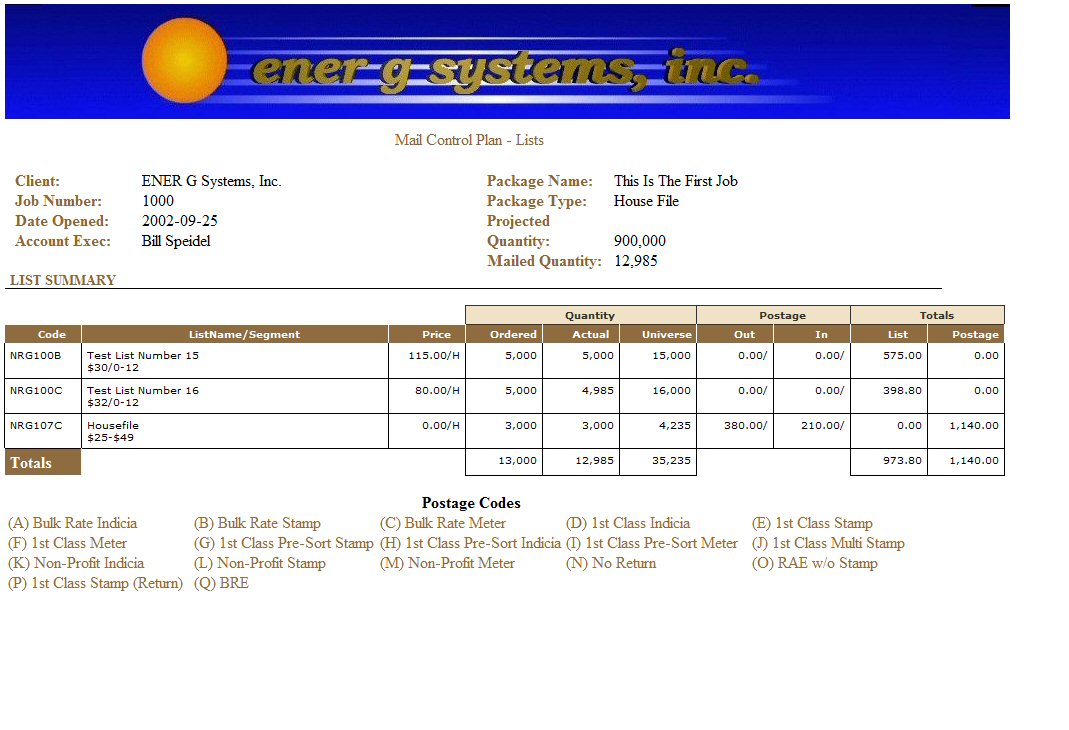
The Mail Control Plan Lists
Other Forms Available On Screen 8
The Art Form can be used to prepare a printed, emailed or faxed form detailing art specifications. The Notes Screen is used to add internal notes about a job. The Cage Detail Screen is used to enter cage results into the system, although importing cage results from a spreadsheet is more efficient for any but the smallest data entry tasks. To Import Cage Detail see The Reports Menu below.
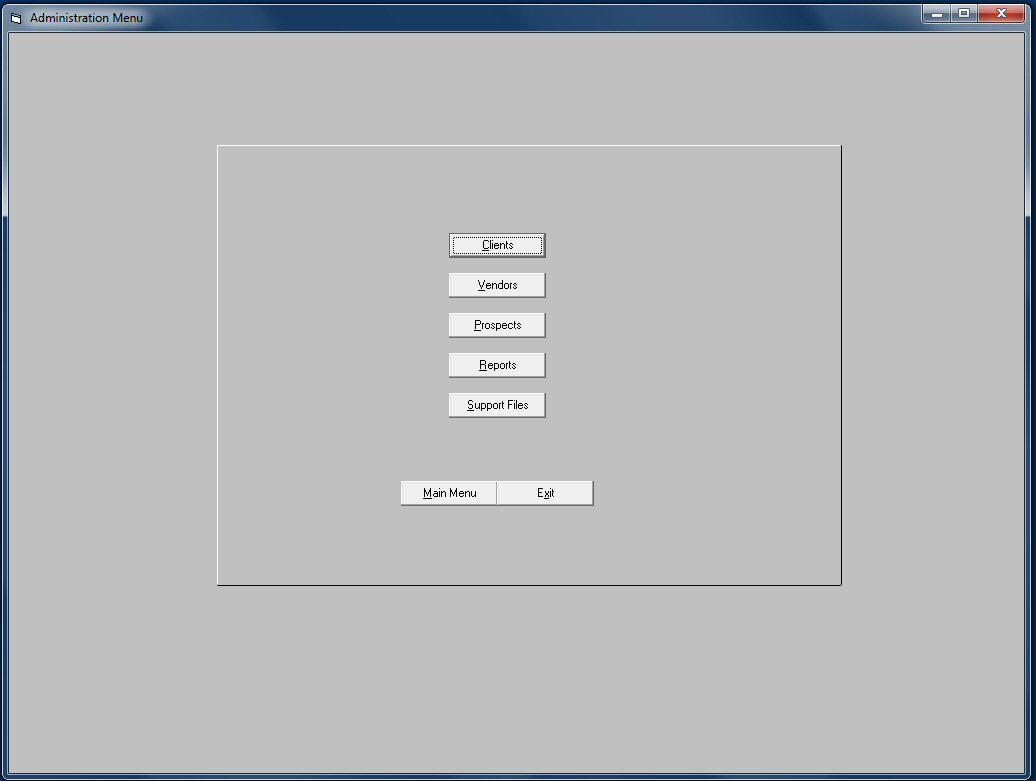
The Administration Menu is the gateway to System Reports and the Support Files. The Clients, Vendors and Prospects tables can be accessed through this menu. The Add, Edit, Delete and Search features work the same as in the job screens. The Prospects table is intended to hold Rolodex type information for business contacts that may or may not be Clients or Vendors. The Prospects table has several reports, such as printing 3 x 10 labels, that can be used for mailings. First, run an SQL query and then print the desired report or labels based on that query.
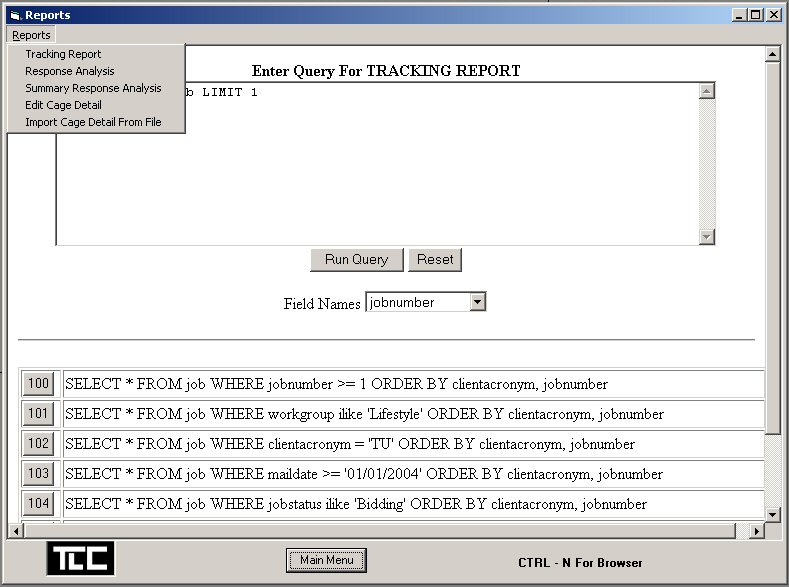
The Reports Screen allows users to create ad hoc queries to run reports. Depending on which report is selected a basic default query is loaded in the top text area and pre-written queries are loaded into the table below. Pre-written queries are Added, Edited and deleted using a selection from The Support Menu. To run a report select the report from the top menu. When the screen loads either select an existing query by clicking the number button next to the query or write a new query from scratch or based on an existing query. Once you are satisfied with your query click the Run Query button and the report will display based on your query. To return to the Reports Screen click the top menu and select the report you wish to run.
If you have displayed the report in a web broser, you can use the back button of the browser or [ALT - <-] (The Alt Key and the left arrow.) Keep in mind that the queries in the bottom table are linked to the type of report. You can also cut and paste queries from a word processor into the query text area.
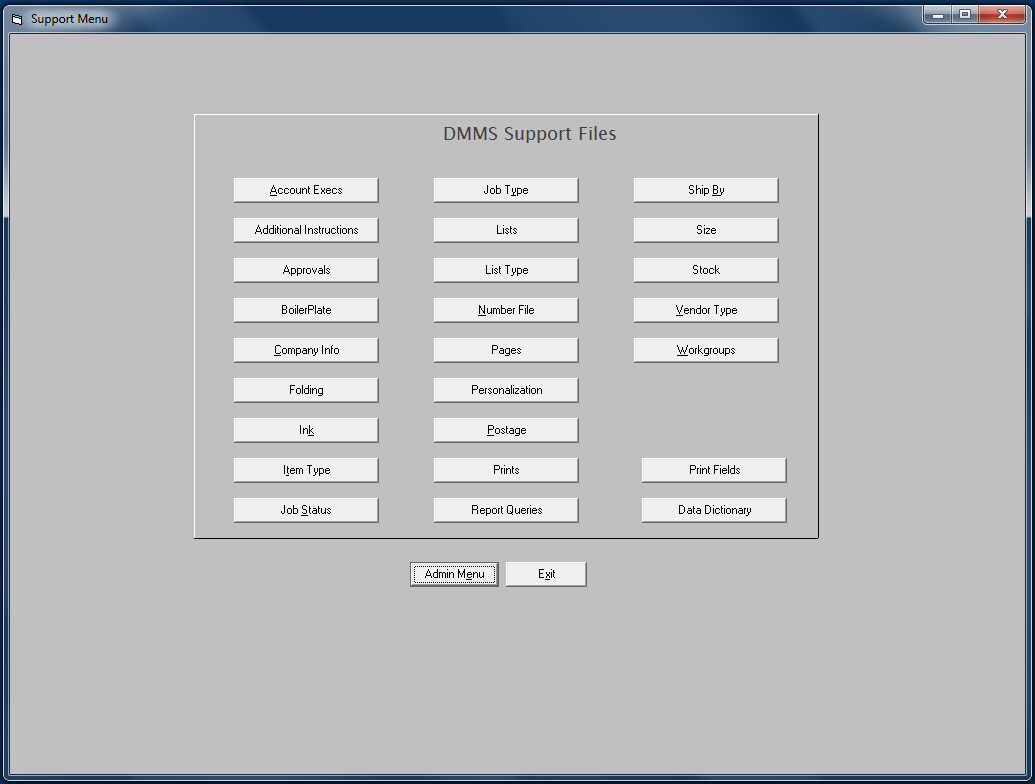
The Support Menu is reached from the Administration Menu and is password protected. These tables should only be revised by administrators. In general all of the support files work in the same way. The data in the tables is used by the system for drop down combo boxes, SQL queries, Boiler Plate and other data that changes infrequently. The Add, Edit, Delete and Save works in same manner as the other screens. Changes to the support files will typically not show up in Job screens until the program is restarted so it is best to revise these tables and then close any open screens and restart the program.
The DMMS Manual, and all web page based screens for the DMMS program are located in the default directory for the Apache Web Server. Each evening a data dump of the entire database is written to the DMMS directory on the Linux server. The Visual Basic dmms.exe program is also in the DMMS directory. These directories should be backed up on removable media and put in a safe place to avoid loss. The Data should be backed up nightly on different media using the following schedule.
| Media 1 | Monday |
| Media 2 | Tuesday |
| Media 3 | Wednesday |
| Media 4 | Thursday |
| Media 5 | Friday |
| Media 6 | Week 1 |
| Media 7 | Week 2 |
| Media 8 | Week 3 |
| Media 9 | Month 1 |
| Media 10 | Month 2 |
| Media 11 | Quarter 1 |
| Media 12 | Quarter 2 |
| Media 13 | Quarter 3 |
| Media 14 | Year End |
It is only necessary to back up the programs once unless there are changes made to the programs, in which case, the programs should be backed up again to save the changes. However, the best course is to back up both the programs and data on a nightly basis to insure that everything is protected against loss.
In the event of a hard drive crash requiring the installation of a new hard drive the following steps should be followed to recover the programs and data.At this point you should be able to begin normal operations. If you get a message saying that the path to the data is incorrect then you must verify that the database is in the same path as the path written in the file "DMMS.ini" in the DMMS directory on each individual PC. The file "DMMS.ini" is read by the program when it first starts and tells the program where to look for the database. If the desktop shortcut or menu item does not start the DMMS program then verify that the shortcut or menu item points to the program "DMMS.exe" on the DMMS server.
| Important Files | |
|---|---|
| DMMS.ini | Resides on each PC. Read By DMMS Program to establish path to Data. |
| DMMS.exe | Resides on DMMS Server. Menu Items And Desktop Shortcuts should point to this file. |
| DMMS Database | Resides on DMMS Server. The PostgreSQL DataBase |
To install DMMS on a new PC you may use the CD that came with the program or a network install. To use the CD, place the CD in the PC and open up the DMMS_Install Dirctory and double-click Setup.exe. DMMS and all necessary programs will be installed on the new PC. If there is no DMMS Directory on the PC, you must create one as C:\DMMS. Then either copy DMMS.ini from another machine or use notepad to create/edit it. Remember to change the shortcur and/or menu items to point to \\server\DMMS\DMMS.exe where server is the name of the Linux server. You can also substitute a TCP/IP address for the server name. (e.g. \\192.168.100.5\DMMS\DMMS.exe)